How to reduce noise in audio recording (Free & Paid Options)
Reducing background audio noise is a major challenge especially in cases where you have no control on the surrounding noise.
Vocal artists , podcasters , voice over artists , music recording artists all have to face this challenge. Online podcast recording using Skype also faces this challenge.
- There are so many questions :
- How to Reduce Audio Noise in Your Recordings ?
- What are the best app to reduce noise in audio recording ?
- How to remove background audio noise from audio recording ?
- How to extract clear voice from a noisy audio file ?
- How to remove background audio noise from mic ?
All of these questions have two answers. You can either record a clean audio or clean it up later in post processing. We will see both the options in detail.
There are 3 main ways to reduce background audio noise during recordings
- Use a app to reduce background noise in audio like KRISP during recording
- Follow low noise capture tips for home recordings
- Use Audacity to remove noise in post production.
What is background audio noise ? Should you really be worried about it ?
The straight answer is YES !! , you should be worried about background noise. It can really distract your listeners. Air conditioner running in background , coffee machine , kids playing , dogs barking , computer fan noise etc. can really get captured in your recording.
Background noise is a kind of hissing noise coming continuously in your recording , it is also known as the room tone. Unless you have a acoustically well treated room you will always get background noise.
This is more critical if you are using a condenser microphone. Dynamic microphones are a little less sensitive for this.
In case you are not using studio monitoring headphones then you may not recognize the background noise also. The audience will recognize this and may be a problem in future .
It can be a podcast , music recording or even a you-tube video , quality of audio is really critical and must be taken care of by the creators.
Reducing background noise during recording is always preferred compared to removing background audio noise in post production. But software options are there.
How to reduce noise in audio recording : During the recording itself !!
The best option always is to reduce the noise captured by the microphone during recording itself. However it may require a costly studio setup and may not be always possible due to certain limitations.
Using app to reduce background noise in audio during recording.
There is a great tool available to reduce the background noise during recording itslef.
The name of the tool is KRISP. It is first & only noise cancellation app for Windows, Mac, and iOS. Available as a Chrome Extention , it is a software tool that will reduce the background noise during recording itself. It works for both Windows and MAC and also supports more than 800 recording apps.
You can signup to check out the free version here or click on below image.
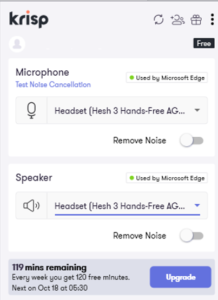
Krisp supports any device such as microphone , headset or speaker and it also supports most of the popular recording , voice recording , conferencing , streaming apps.
You can download the app , it will appear in taskbar with options to mute the background noise for microphone and speaker. This is really helpful for removing background audio noise for music , vocal recording or podcasting. It also effectively removes background audio noise for video calls or conferencing.
Krisp is Named One of 20 Rising Stars as Part of Forbes’ Cloud 100 List and will certainly help you if you are into audio recording. If you are looking for some good snipping tools then you can read about best snipping tools for mac here.
If you are looking to record audio at your home for podcasting or music recording purpose then here are some tips for recording great audio with very less background noise.
5 Tips for Limiting Room Noise in Case of Home Recording
Pick the best sounding room in the house : Select a room in your house with some soft furniture and as quiet as possible during your recording timings. You can also check the background noise in your room by doing a trial.
Acoustically treat the room : If possible you can add some acoustic panels to the walls , rugs on the floor. This will help to reduce the sound bouncing off the walls and will reduce the background audio noise.
Get close to the mic : Get close to the mic , microphones have a tendency to pick up a lot of background noise if your own sound level is low. This is true for both condenser and dynamic mics. Get close and speak loudly without crossing the safe sound levels to get best effect.
Switch off fans and other electrical equipment , put your phone on silent mode ! : Most of the background noise comes from high frequencies of AC or room fans or computer fans , coffee machines and other electrical equipment . Switch off whats not needed and you are god to go. Your phone can be a real nuisance, put it on silent and no vibration mode during recording.
Use a makeshift barrier around you and microphone : You may not believe but this trick really makes wonders. A small barrier can make a lot of difference to the noise signal captured by your microphone.
How to Reduce Background Audio Noise in Your Recordings : After the recording !
Once you record an audio and find out that there is background noise then you have no choice but to resort to the background audio noise removal tools.
Audacity is a great tool that can be used to record and edit your audio. And best part is it is FREE !!
How to Remove background noise in Audacity ?
Noise Reduction can reduce constant background sounds such as hum, whistle, whine, buzz, and “hiss”, such as tape hiss, fan noise or FM/webcast carrier noise. It is not suitable for individual clicks and pops, or irregular background noise such as from traffic or an audience.
To use Noise Reduction, you need a region in the waveform that contains only the noise you want to reduce. Audacity is a great app to reduce background noise in audio.
Be aware that it may be impossible to get a satisfactory removal when the noise is very loud, when the noise is variable, when the music or speech is not much louder than the noise or when the noise frequencies are very similar to those of the music or speech.
The first and most important part of this process is to capture the noise profile before the actual recording.
For doing this you will need to record the first 5 to 10 seconds of the recording without speaking or playing anything. Just capture the background noise with your microphone. This will help us later to identify the room noise and remove it effectively.
Following are the steps to remove background noise in Audacity.
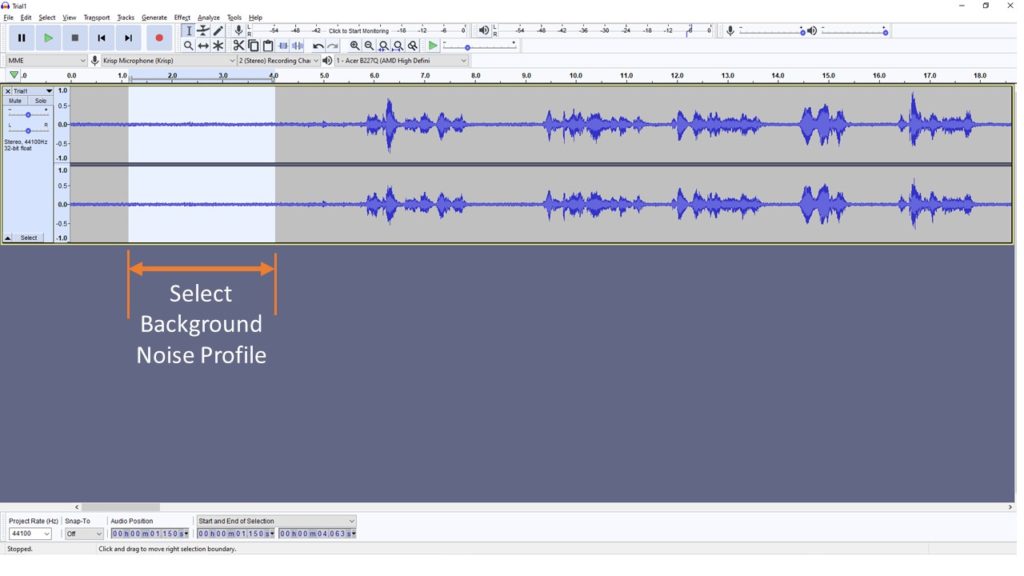
Step 1 : Identify the section with background noise and select it using cursor in Audacity.
Select a region of the waveform which contains only noise. A minimum of 2048 samples (0.05 sec. at 44100 Hz sample rate) is needed, below which an error will be shown. A longer profile is better. If there are very different types of noise in different places in the track, they are best dealt with by grabbing the profile for the first type, reducing the noise for it, then grabbing the profile of the next type of noise and reducing that.
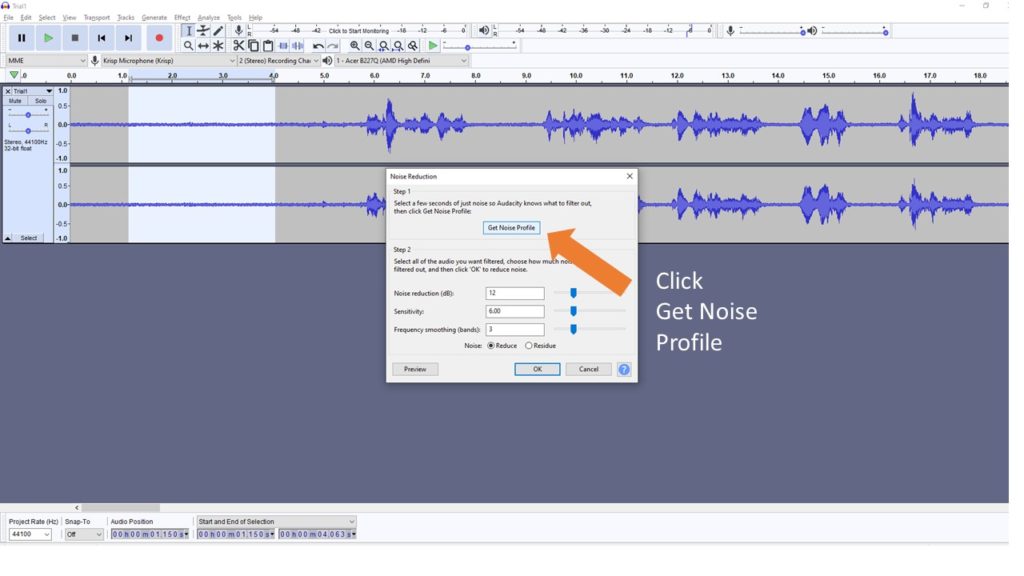
Step 2 : Go to effects , Noise reduction and click Get Noise Profile
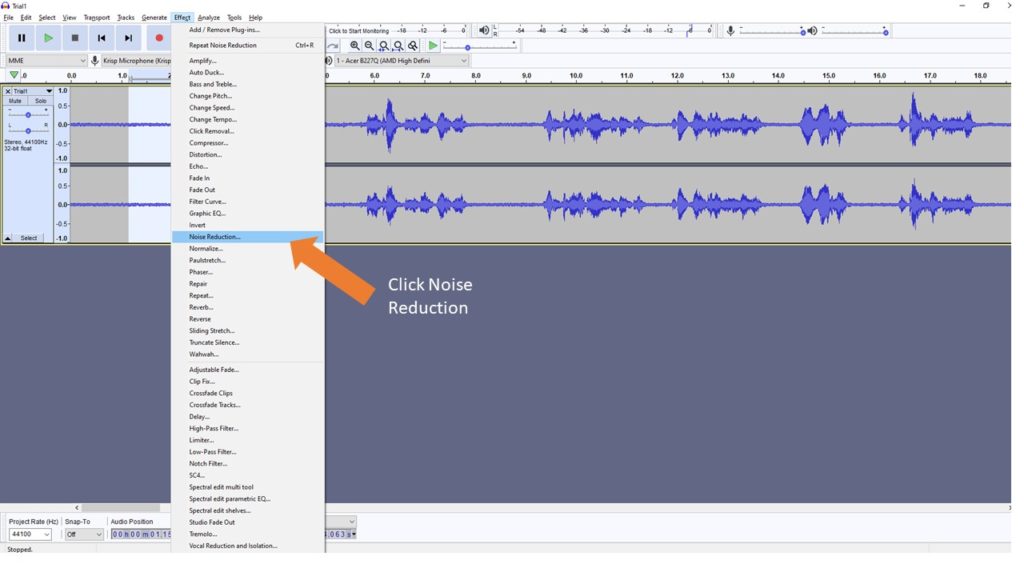
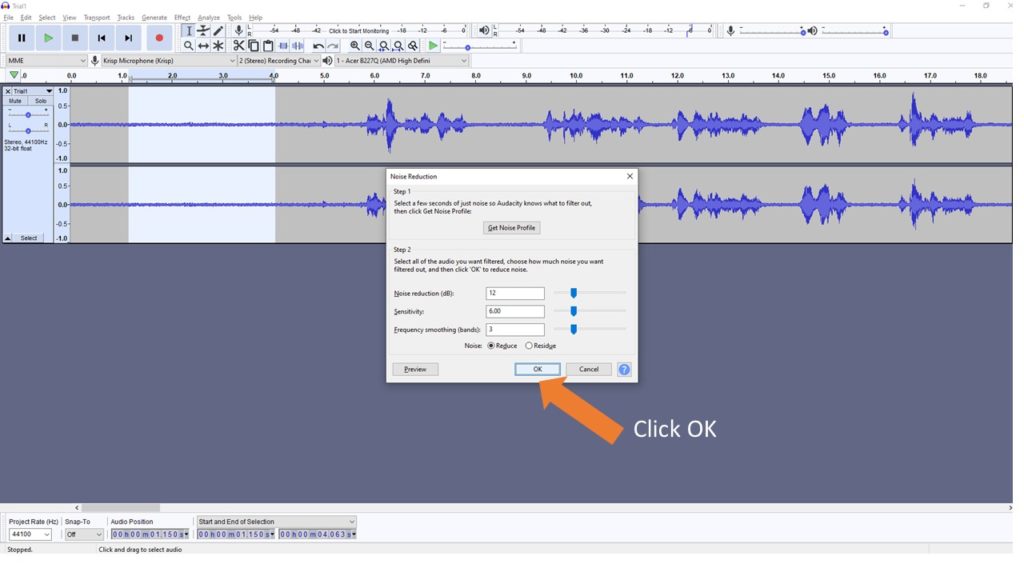
Step 3: No select the entire recording , go to effects , noise reduction , click OK.
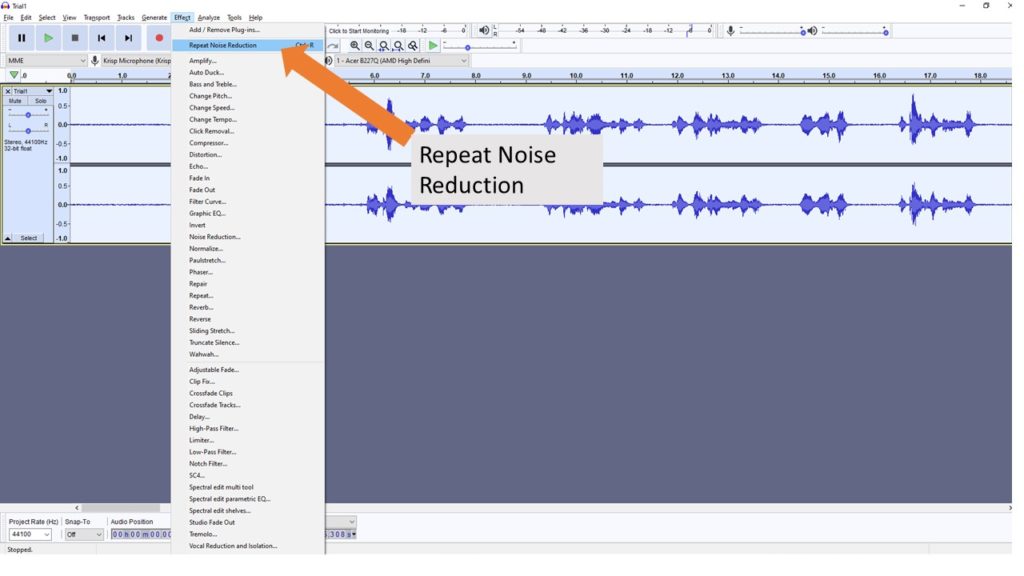
Step 4 : Check if the noise reduction has happened as per requirement , if not noise reduction.
What the sliders do ??
Noise Reduction: Controls the amount of reduction of your noise volume. More the number higher will be the noise reduction. Decreasing Noise Reduction also decreases the chance of losing sound you want to keep (as indicated by hearing bits of the desired audio in the residue), but will increase the amount of noise remaining in the result when applying the effect with selected radio button Reduce selected.
Sensitivity: Controls the range of what is considered as noise. The higher this goes the more your actual audio (such as your voice) will be affected. Decreasing Sensitivity decreases the chance of losing sound you want to keep (as indicated by hearing bits of the desired audio in the residue), but increases the chance of there being artifacts sounding like “tinkly bells” when applying the effect with selected radio button Reduce selected.
Frequency smoothing: The default setting is setting is 3, settings lower than this tend to favor music and higher settings tend to favor spoken word.
At values of 1 or higher, this control spreads the noise reduction into the specified number of neighboring bands. This modifies the signal you were intending to keep, but if artifacts remain in the noise-reduced audio the smoothing can make those artifacts sound more acceptable. There is a chance that smoothing will make the desired audio less clear, so where your desired signal is strong and of wide frequency range and the noise is light, try leaving this control at 0 (off).
If you hear artifacts in the noise-reduced audio after setting Sensitivity as high as possible without eliminating desired audio, try setting Frequency Smoothing to a value between 1 and 6 bands. The width (in Hertz) of a frequency band is dependent on the sampling frequency of the track. Width = sampling frequency / 2048 = 21.53 Hz at 44100 Hz sampling rate.
Time smoothing is always applied by Noise Reduction (attack of 20 milliseconds and release of 100 milliseconds) but the settings are not configurable. Any frequency smoothing you request is applied after time smoothing.
The default setting is setting is 3, settings lower than this tend to favor music and higher settings tend to favor spoken word.
Reduce and residue buttons: Reduce is what you’ll want for a good preview. It plays what the audio will sound like with noise removed. If you want to hear exclusively what the noise reduction is taking out, select residue and click preview. Select this option to hear the sound that would be filtered out if you chose “Reduce”. This is useful for finding the optimum settings that do not damage the audio. If you can hear recognizable bits of the desired sound in the residue, it is likely that you have set Noise Reduction too high or Sensitivity too high.
Tips :
- Amplify or Normalize may be done before or after Noise Reduction.
- Do any Notch Filtering or Click Removal before doing noise reduction.
- Do any compression or any other effects not mentioned above after doing noise reduction, not before.
Summary :
There are options available to remove the background audio noise using software tools in post production and with recent advancement of technology it is possible to do a good job at it.
However , it is always better to get a clean recording and we will always recommend to get a cleaner recording using KRISP or some of the low noise capture tips for home recording .
Recording a cleaner sound with less background audio noise will always be better than removing it later.
Some Technical Stuff !!
Reducing noise usually results in some distortion. This is normal and there is nothing you can do about it.
When there’s only a little bit of noise, and the signal (that is, the voice, music or other desired sound) is much louder than the noise, this effect works well and there’s very little audible distortion.
Unfortunately, when the noise is very variable or very loud (the signal is not much louder than the noise) the result may be too distorted.
Artifacts: These typically consist of random bursts of very short tones at random frequencies, sometimes called “musical noise”, “bird song” or “tinkly-bells”. These may be visible in Spectrogram view.
Artifacts can happen if the noise floor is higher than was estimated, either because Sensitivity was set too low, or because the noise profile was not representative of the noise throughout the track. Although most of the noise will be suppressed most of the time, random artifacts may occur, which can be even more objectionable than the original noise.
For a more technical explanation of artifacts, see How Audacity Noise Reduction Works in the Wiki.
Welcome to your podcasting journey with quickstartpodcast team.
Below paragraphs have links to all our posts in a logical manner starting from being a podcast listener to being a podcast creator.
The podcast Listener phase :
The podcasting journey generally begins with various questions such as what is a podcast , what a podcast is used for ? how to listen to a podcast , what are the best android and iOS apps to listen to podcast .
Depending upon the things that you like you will search for fiction podcasts , educational podcasts etc. Most of the people restrict their journey in podcasting to this level. They just end up being listeners to podcasts. Some of then take the next leap of faith and decide to start their own podcast.
Podcast creator Phase :
How to start your podcast ? is the main question they are faced with . Once that you have decided to start a podcast , what should be the name of the podcast , what should be the podcast format , which podcasting niche should you chose , what should be episode titles , what are popular podcast formats and what should be mine and so on ..
What is the right equipment for creating a podcast , what are the best XLR , USB , Condenser and dynamic microphones available. Can I record my podcast in an iPHONE , What should be the polar pattern , should I use an audio interface or a mixer , do I need a POP filter . There are so many question . How much podcasting will cost me , what are different setups based on my budget.
Once you in the journey of podcasting you will need to decide how should be a great podcast intro , how to record the podcast , how to record podcast online , how to test the mic , what should be length and frequency of my podcast , how to make great sounding podcasts and finally how to make money from podcasting ? ..
Whats is a podcast host and do I need one ?? , Uploading podcasts to google podcast and Apple podcasts are also crucial steps.
The journey starts from being a podcast listener going all the way to being a great podcast creator and quickstartpodcast is there with you in all this journey.